Congratulations on progressing to Lesson 2. In this lesson we will:
By now your left hand fingers should be toughening up a little and you should be starting to enjoy yourself.
Firstly, check the three chords you have learnt and ensure that you are getting good sound quality with them, that is no buzzing or thunking. If they are still sounding fuzzy, please check:
Secondly, keep working towards smooth chord changes with the minimum
of pauses. It is better, initially, to play too slowly with smooth
changes. Your speed will improve as you go along. Don't force
it now.
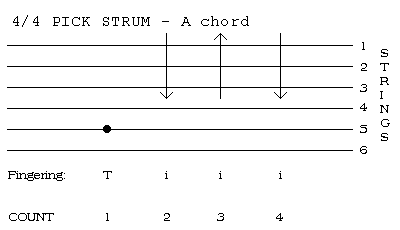
Today's strum I call a Pick strum
This strum is basically the same as the previous one except that your thumb picks a single string instead of strumming.
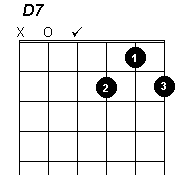
Go back to your chord grids and you will notice that each chord has a tick over one of the bass strings. This indicates the string that should be picked. For instance, on an:
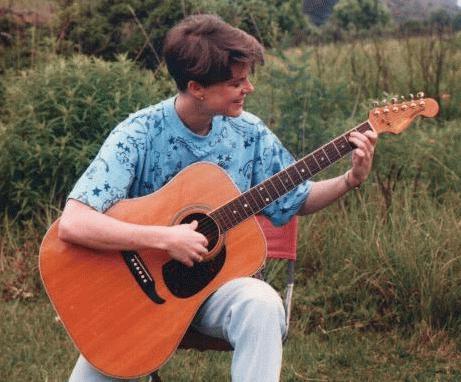
Initially, you will find this more difficult until your thumb learns to obey you. Keep your thumb out at the side so that it doesn't get in the way of your fingers ( refer to the sitting position graphic below).
Practice this strum without any chords until you get the feel of it letting your thumb pick the sixth, fifth and fourth strings alternately. Then practice with A, D and E chords picking the correct string.
Please note that if you find this strum too difficult to use with your song right now you may continue using the basic 4/4 strum. This course, however, will introduce many variations of pick strumming in later lessons, so it is important that you spend some time practicing it.
I use a thumb pick for pick strumming and for picking (which will be covered in a later lesson). This gives a clear, clean, crisp sound to your bass string picking. It is entirely optional. You may like to try one now or later or not at all! The choice is up to you.
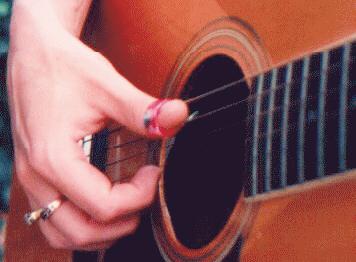

Thumb picks will be available at your local music store. They
come in different shapes and sizes so choose one that feels comfortable
for you. As they are inexpensive and easily lost perhaps you should
get two or three. Please note that it is a thumb pick and
not a plectrum or a finger pick
Depending on the song you have chosen for this lesson, you may or may not be using a G chord. However, I would like you to start working on it now as it will definitely be coming up soon and requires a lot of practice.
There are two different ways of fingering a G chord:
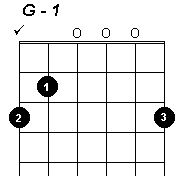
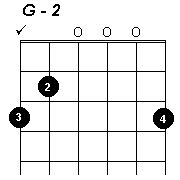
The first option is, initially, easier to play but it is desirable to learn method 2 as soon as possible. Method 2 leaves your first finger free to play another string in the first fret in addition to the three strings you are holding. It also makes chord changes easier and quicker. If you really battle with method 2 you may use the easy option initially but sooner or later you'll really need method 2.
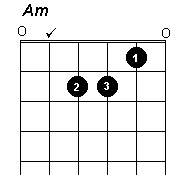
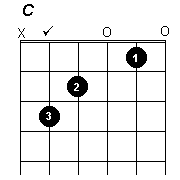
Here are a few more chords that you may or may not need for this lesson's song but which will be cropping up shortly. They are all basic chords that you will use in many songs. Please try them all.
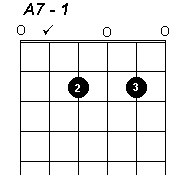


Note that where chords are marked A7-1 or E7-1 etc, this indicates
that there are other options for fingering these chords. These
alternatives will be introduced later in the course.
This is a small device that you clip onto the neck of your guitar

It enables you to change the pitch of your guitar and sing the song a little higher without transposing the key. Our voices are all pitched differently and some of my arrangements may be too low for your voice. A capo will remedy this problem.
Placing the capo at the first fret raises the pitch of your song one semitone, at the third fret three semitones and so on.
Please note that my arrangements of the songs are not necessarily in the keys of the original artists. Many of them have been modified to simplify the chords for you initially. Use of the capo is the easiest way of adjusting the key without increasing the difficulty of the song.
Please note, also, that there are different capos for different types of guitar. A nylon string guitar requires a flat capo whereas a steel string guitar requires a curved one.
Here are the words and chords of the songs that accompany this lesson. Please choose the song you know best to practice with this lesson initially. You are, of course, welcome to try all of them.
Instructions for playing each song and a sound file of how the song should be played are included within each song.
While the original intention of the paid course was to include personalized feedback from Joni on your progress and any problems you may experience, this no longer applies to these free lessons.
However, if you have found the lesson useful, Joni would appreciate an email from you on shuter@mweb.co.za
Having said all that, you are still at liberty to proceed at your own pace if you wish.
Lesson 3 will introduce using alternating bass strings with a pick strum, other tuning methods, new chords and new songs. The songs are
To get lesson 3, please click here.
Return to Joni's Guitar School Home Page
© 1997 Joni's Guitar School